Litex C Helloworld
This chapter covers the basics of Litex C embedded projects including creating, building, running, and debugging baremetal applications. The project referred to in this chapter is called “Hello World.” This application prints “Hello World” text and runs a simple for-loop as a simple demonstration. The application can also be built and run on hardware.
Components Prerequisites
To build, run and debug GNU Helloworld applications, please make sure that all below components are installed. Please refer to Component management for more information about installing component.
- xplor-studio-baremetal-debug-plugin: ELF XploR Studio Plugin using for creating baremetal examples
- rv-xplor-elf-linux64/rv-xplor-elf-win64: XploR Embedded Toolchain for RISC-V (supported both 32 and 64-bit)
- xplor-studio-hardware-target: XploR Studio Plugin using for debugging applications on Hardware
- openocd-linux64/openocd-win64: OpenOCD binary to provide debugging, in-system programming and boundary-scan testing for embedded target devices
All above components are compulsory for debugging RISC-V applications on real hardware. Depending on Bitfiles or FPGA Board, XploR Studio has many example components for specific cases:
- baremetal-corevmcu-s10gx-helloworld-example: Hello World Baremetal Project for CORE-V-MCU run on Intel Stratix 10 GX board
- Requires: s10gx-corevmcu-bit
- baremetal-neorv32-de2115-helloworld-example: Hello World Project for NEORV32 (Litex) run on Terrasic DE2-115 board
- Requires: de2115-neorv32-bit
- baremetal-vexriscv-agilex-helloworld-example: Hello World Project for VexRiscv (LiteX) run on Intel Agilex board
- Requires: agilex-vexriscv-bit
- baremetal-vexriscv-c10gx-helloworld-example: Hello World Project for VexRiscv (LiteX) run on Intel Cyclone 10 GX board
- Requires: c10gx-vexriscv-bit
- baremetal-vexriscv-s10gx-helloworld-example: Hello World Project for VexRiscv (LiteX) run on Intel Stratix 10 GX board
- Requires: s10gx-vexriscv-bit
Moreover, it is necessary to install Quartus Programmer for programming Bitfile. After installation, please add Quartus to your environment path before starting XploR Studio.
Working flow
Create project
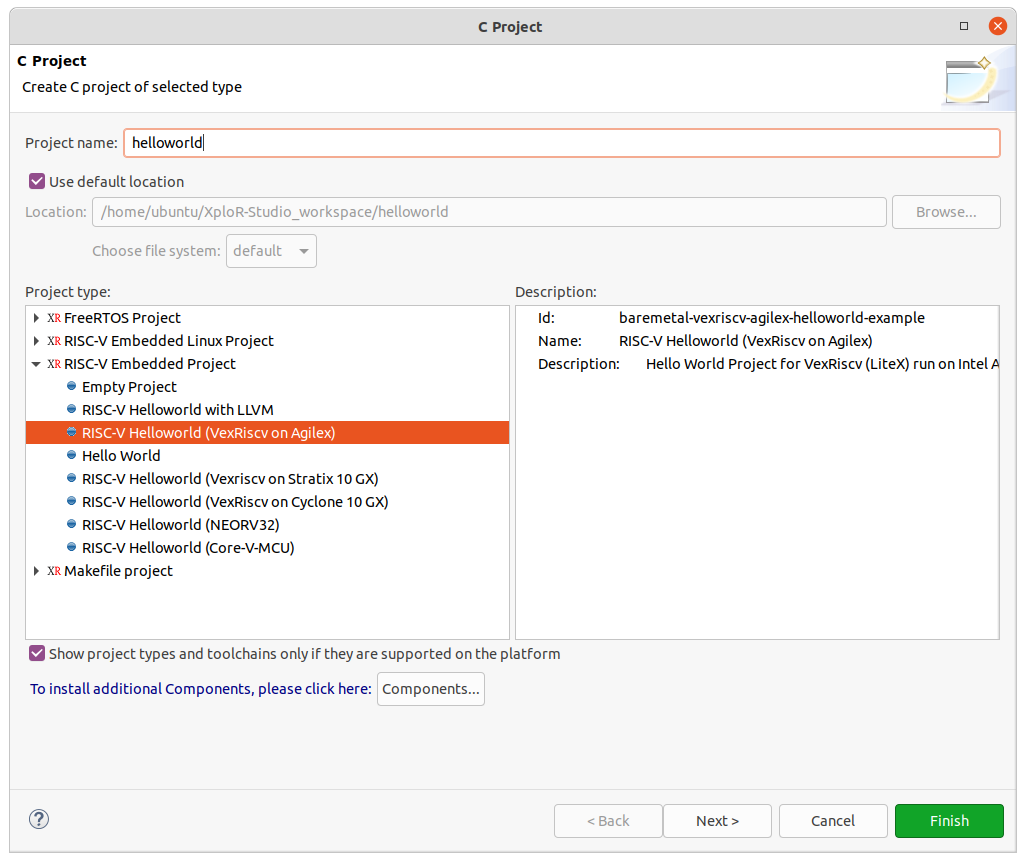
- To create a new project, select File > New > C Project, please choose the suitable project (after clicking on a project, XploR Studio will show the description of that project):
- Other steps (Update build settings, Build project) are same as the quick-start project. Please refer to Quick start with FreeRTOS project for general working flow.
Flash Bitfile
To program a RISC-V Bitfile to the board, click on Flash icon  on the toolbar
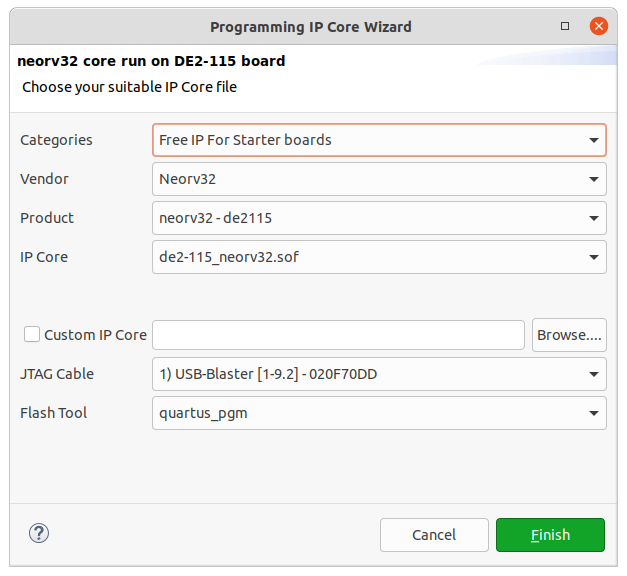
- In the Bitfile, select de2115-neorv32.sof or Custom Bitfile if users use their own RISC-V Bitfile. In this case, we select de2-115_neorv32 for the neorv32 - DE2-115 project.
- Select JTAG cable (if the user has multiple boards connected to the development machine).
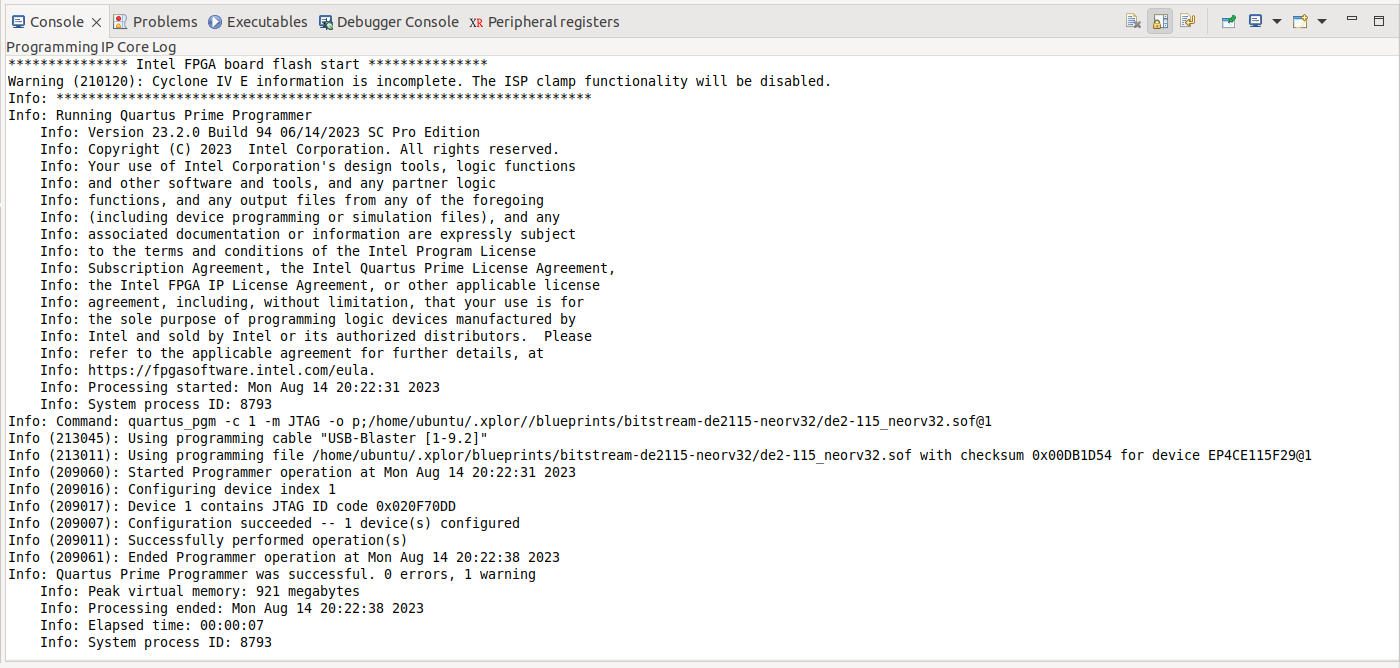
- Click Finish to flash NEORV 32-bit RISC-V core to DE2-115 board.
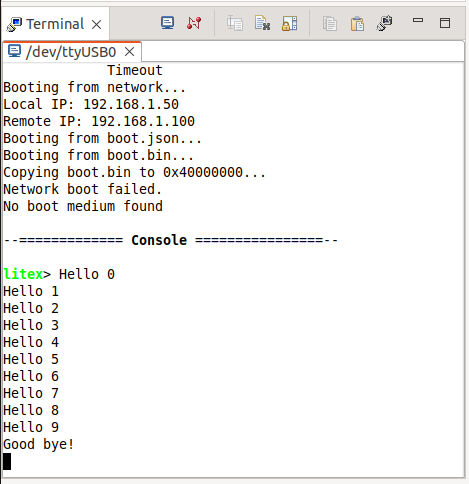
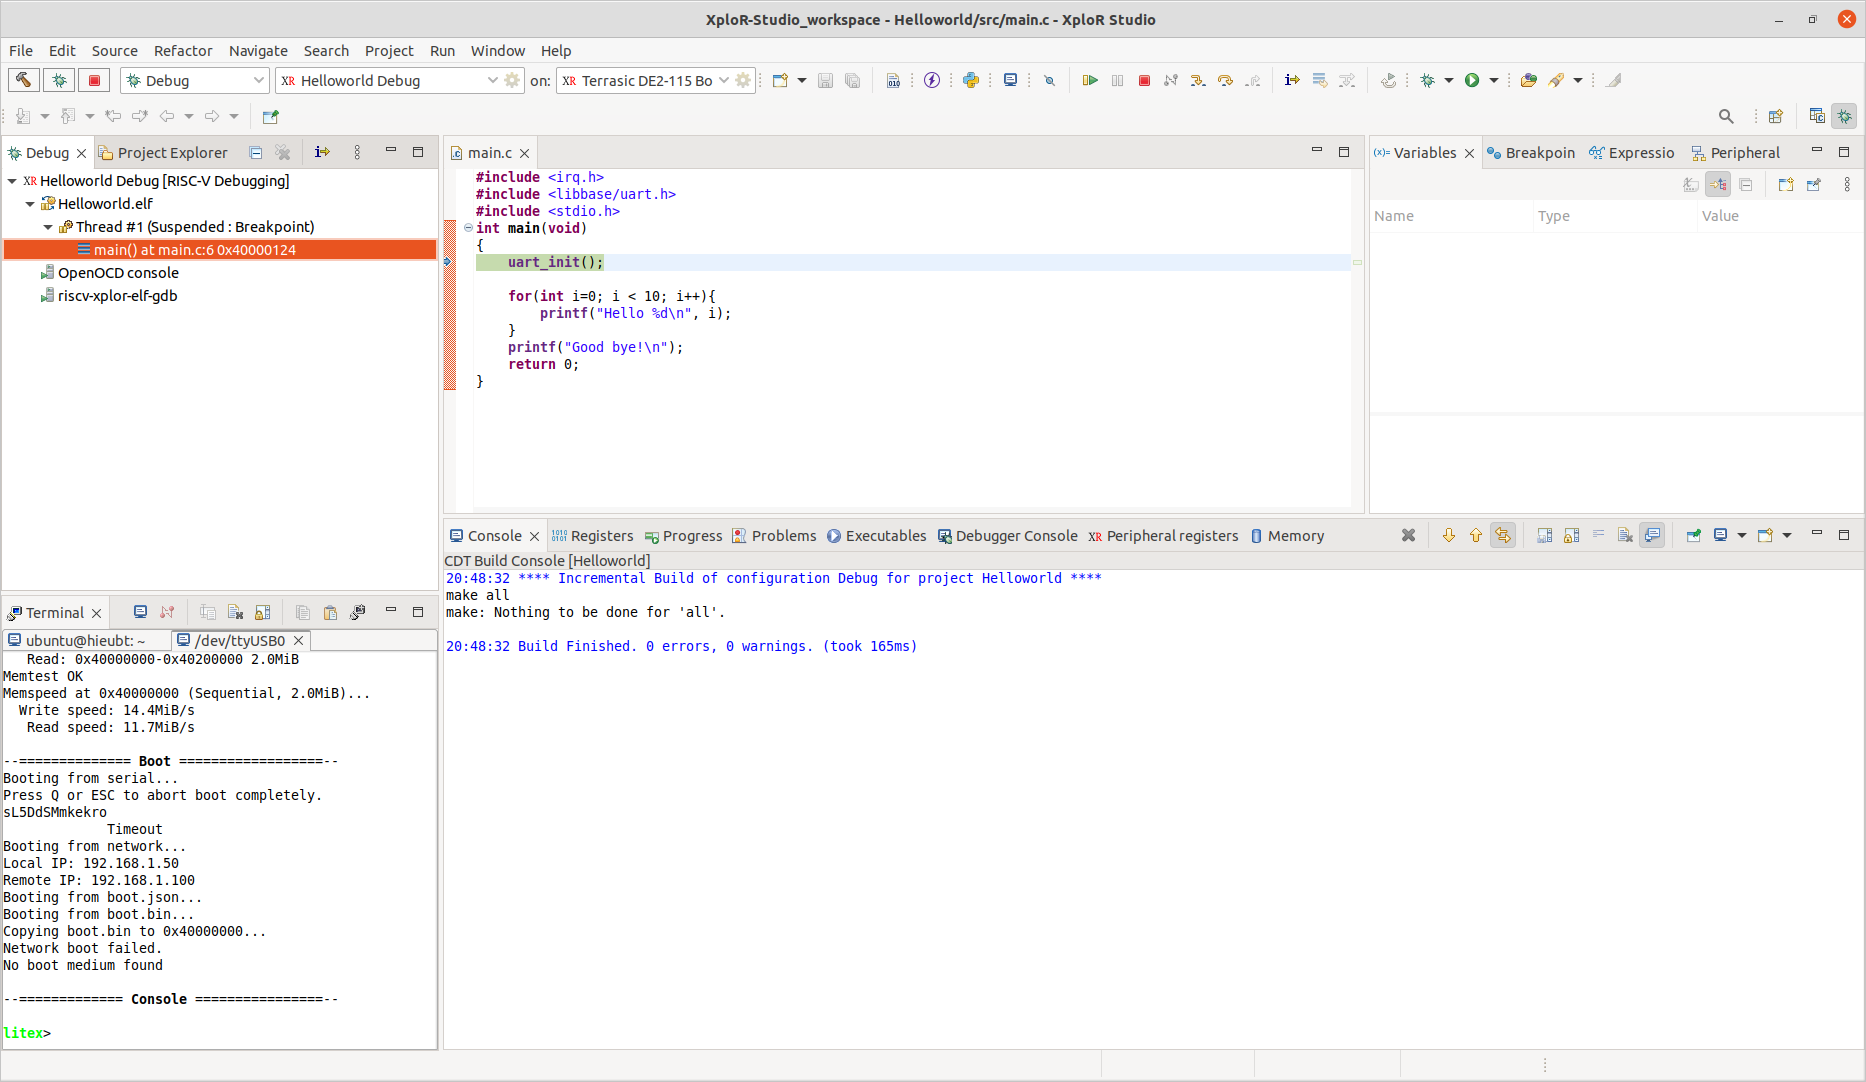
To view the console output printed from the RISC-V core (for NEORV32 core), open the Terminal view, select Serial Terminal and select COM port (on Windows) or /dev/ttyUSBx port (on Linux) with the following connection settings.
The output message on the serial terminal will look like this:
    _   _           _           ____         ____
   | | | |_   _  __| |_ __ __ _/ ___|  ___  / ___|
   | |_| | | | |/ _` | '__/ _` \___ \ / _ \| |
   |  _  | |_| | (_| | | | (_| |___) | (_) | |___
   |_| |_|\__, |\__,_|_|  \__,_|____/ \___/ \____|
          |___/

           Maximize your SoC design!

 (c) Copyright 2020-2023 SoC.One
 (c) Copyright 2012-2023 Enjoy-Digital
 (c) Copyright 2007-2015 M-Labs

 BIOS CRC passed (42b17cce)

 HydraCore git sha1: --------

--=============== SoC ==================--
CPU:            NEORV32 @ 50MHz
BUS:            WISHBONE 32-bit @ 4GiB
CSR:            32-bit data
ROM:            64.0KiB
SRAM:           64.0KiB
SDRAM:          128.0MiB 32-bit @ 50MT/s (CL-2 CWL-2)
MAIN-RAM:       128.0MiB

--========== Initialization ============--
Ethernet init...
Initializing SDRAM @0x40000000...
Switching SDRAM to software control.
Switching SDRAM to hardware control.
Memtest at 0x40000000 (2.0MiB)...
  Write: 0x40000000-0x40200000 2.0MiB
   Read: 0x40000000-0x40200000 2.0MiB
Memtest OK
Memspeed at 0x40000000 (Sequential, 2.0MiB)...
  Write speed: 14.4MiB/s
   Read speed: 11.7MiB/s

--============== Boot ==================--
Booting from serial...
Press Q or ESC to abort boot completely.
sL5DdSMmkekro
             Timeout
Booting from network...
Local IP: 192.168.1.50
Remote IP: 192.168.1.100
Booting from boot.json...
Booting from boot.bin...
Copying boot.bin to 0x40000000...
Network boot failed.
No boot medium found

--============= Console ================--

litex>
To view the console output printed from the RISC-V core (for VexRISCV core), open the Terminal view, select Local Terminal and run:
$ jtagconfig -d
1) USB-BlasterII [1-8]
   (JTAG Server Version 23.2.0 Build 94 06/14/2023 SC Pro Edition)
  031820DD   10M08SA(.|ES)/10M08S(C|L) (IR=10)
    Design hash    BBCCCB3AC441E26FCFFA
    + Node 1C106E00  JTAG Avalon #0
    + Node 30286E00  Parallel Flash Loader #0
  02E120DD   10CX220Y (IR=10)
    Design hash    C19BBD971B8FE87E0FB0
    + Node 08986E00  Nios V #0
    + Node 0C006E00  JTAG UART #0

  Captured DR after reset = (0063041BB02E120DD) [65]
  Captured IR after reset = (0AAD55) [21]
  Captured Bypass after reset = (2) [3]
  Captured Bypass chain = (0) [3]
  JTAG clock speed auto-adjustment is enabled. To disable, set JtagClockAutoAdjust parameter to 0
  JTAG clock speed 24 MHz
So the index of cable is 1, then run nios2-terminal -c 1 -d 2 -i 0 and the output will be like this:
nios2-terminal: connected to hardware target using JTAG UART on cable
nios2-terminal: "USB-BlasterII [1-8]", device 2, instance 0
nios2-terminal: (Use the IDE stop button or Ctrl-C to terminate)


    _   _           _           ____         ____
   | | | |_   _  __| |_ __ __ _/ ___|  ___  / ___|
   | |_| | | | |/ _` | '__/ _` \___ \ / _ \| |
   |  _  | |_| | (_| | | | (_| |___) | (_) | |___
   |_| |_|\__, |\__,_|_|  \__,_|____/ \___/ \____|
          |___/

           Maximize your SoC design!

 (c) Copyright 2020-2023 SoC.One
 (c) Copyright 2012-2023 Enjoy-Digital
 (c) Copyright 2007-2015 M-Labs

 BIOS CRC passed (ac8aa09b)

 HydraCore git sha1: --------

--=============== SoC ==================--
CPU:            VexRiscv_VjtagDebug @ 100MHz
BUS:            WISHBONE 32-bit @ 4GiB
CSR:            32-bit data
ROM:            64.0KiB
SRAM:           64.0KiB
L2:             8.0KiB
MAIN-RAM:       1.0GiB

--========== Initialization ============--
Ethernet init...
Memtest at 0x40000000 (2.0MiB)...
  Write: 0x40000000-0x40200000 2.0MiB
   Read: 0x40000000-0x40200000 2.0MiB
Memtest OK
Memspeed at 0x40000000 (Sequential, 2.0MiB)...
  Write speed: 31.2MiB/s
   Read speed: 23.0MiB/s

--============== Boot ==================--
Booting from serial...
Press Q or ESC to abort boot completely.
sL5DdSMmkekro
Timeout
Booting from network...
Local IP: 192.168.1.50
Remote IP: 192.168.1.100
Booting from boot.json...
Booting from boot.bin...
Copying boot.bin to 0x40000000...
Network boot failed.
No boot medium found

--============= Console ================--

litex>
Now the board is ready to run or debug applications.
Run project on hardware platform
It is recommended to program the bitstream to board before starting running project. Please refer to previous section for how to program the bitstream.
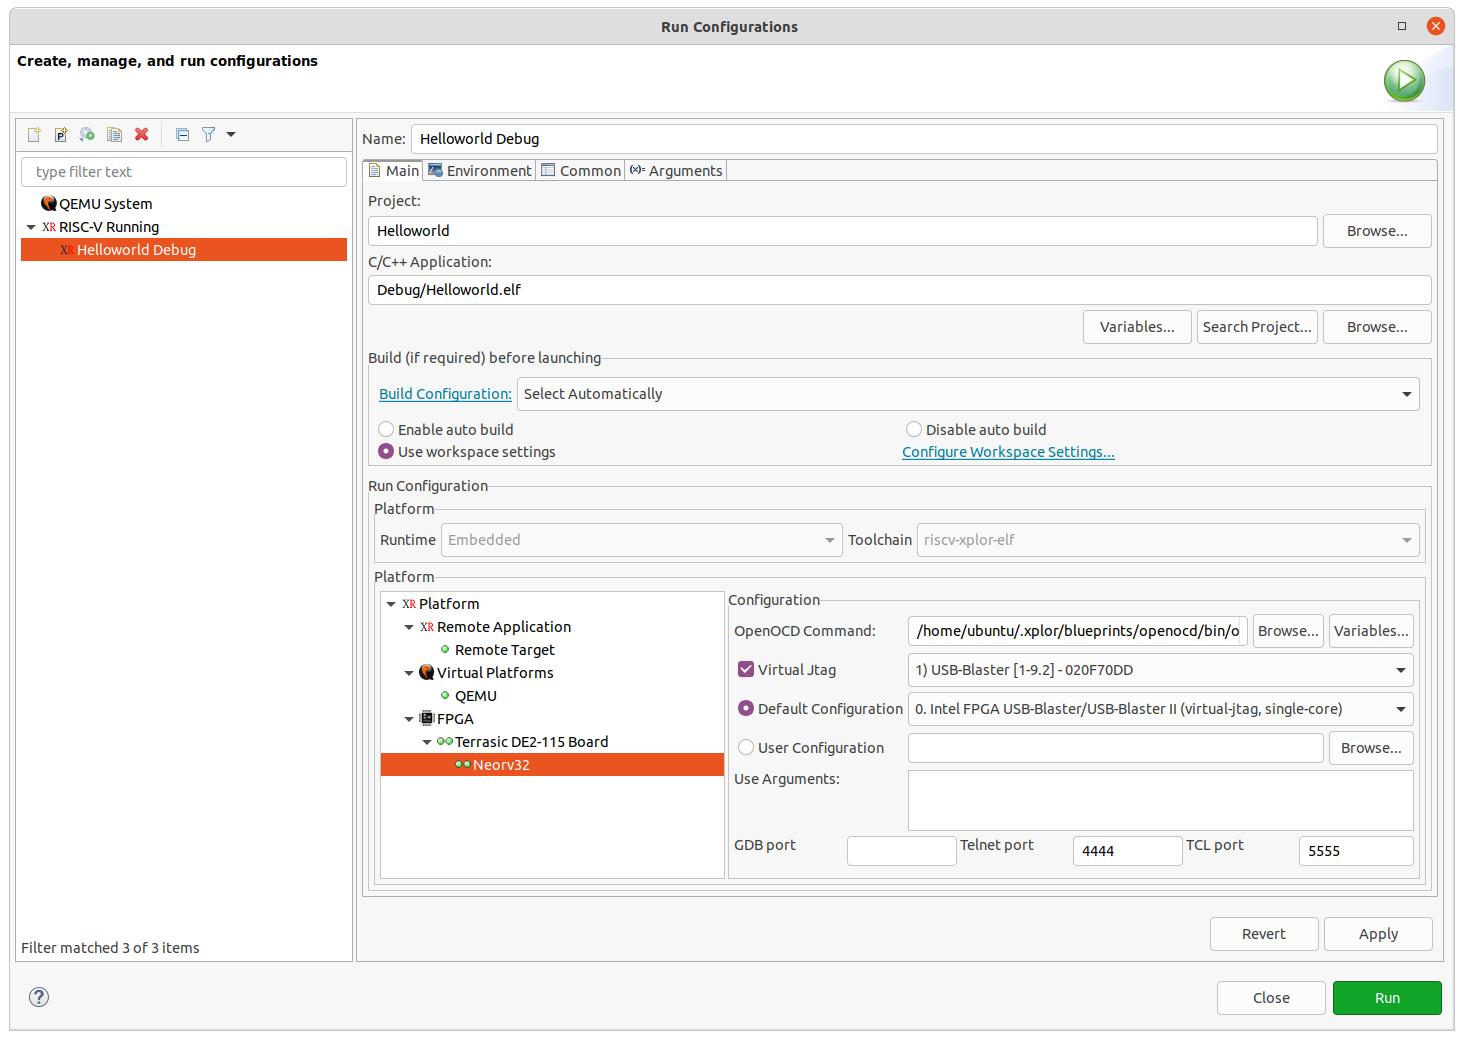
To run the application on hardware without debugging, select project in the Project Explorer, click Run as > Run configurations.
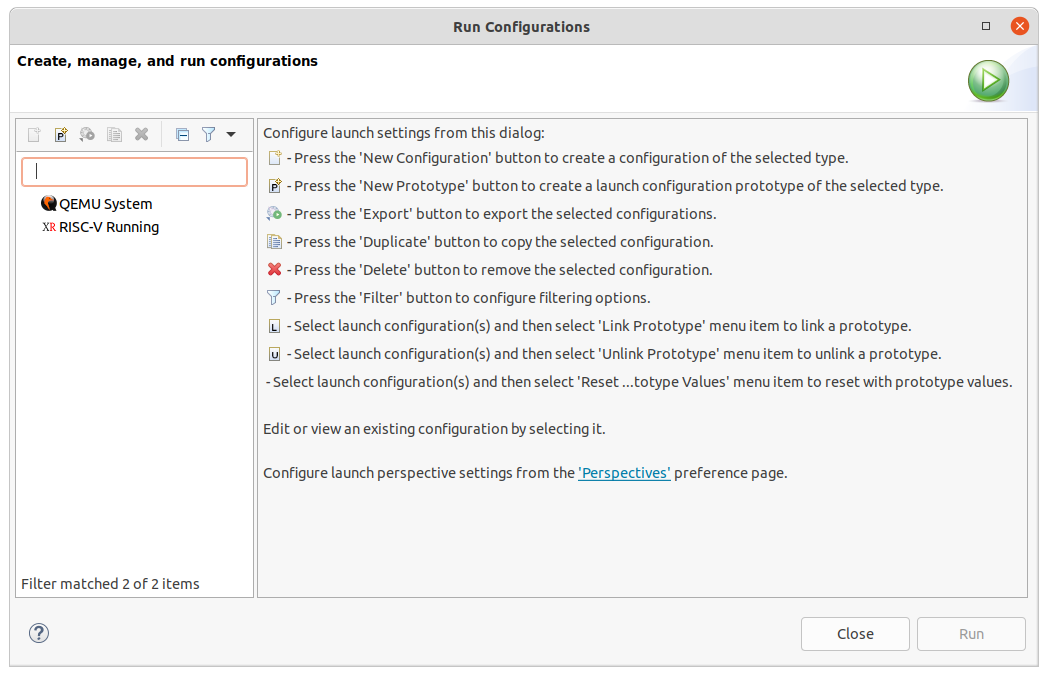
Then create a new RISC-V Running configuration with the following information.
- Platform: Choose hardware platform, for example: FPGA > Terrasic Board > Neorv32
On the Terminal view, the message will be printed.
Debug project on hardware platform
It is recommended to program the bitstream to board before starting debugging project. Please refer to previous section for how to program the bitstream.
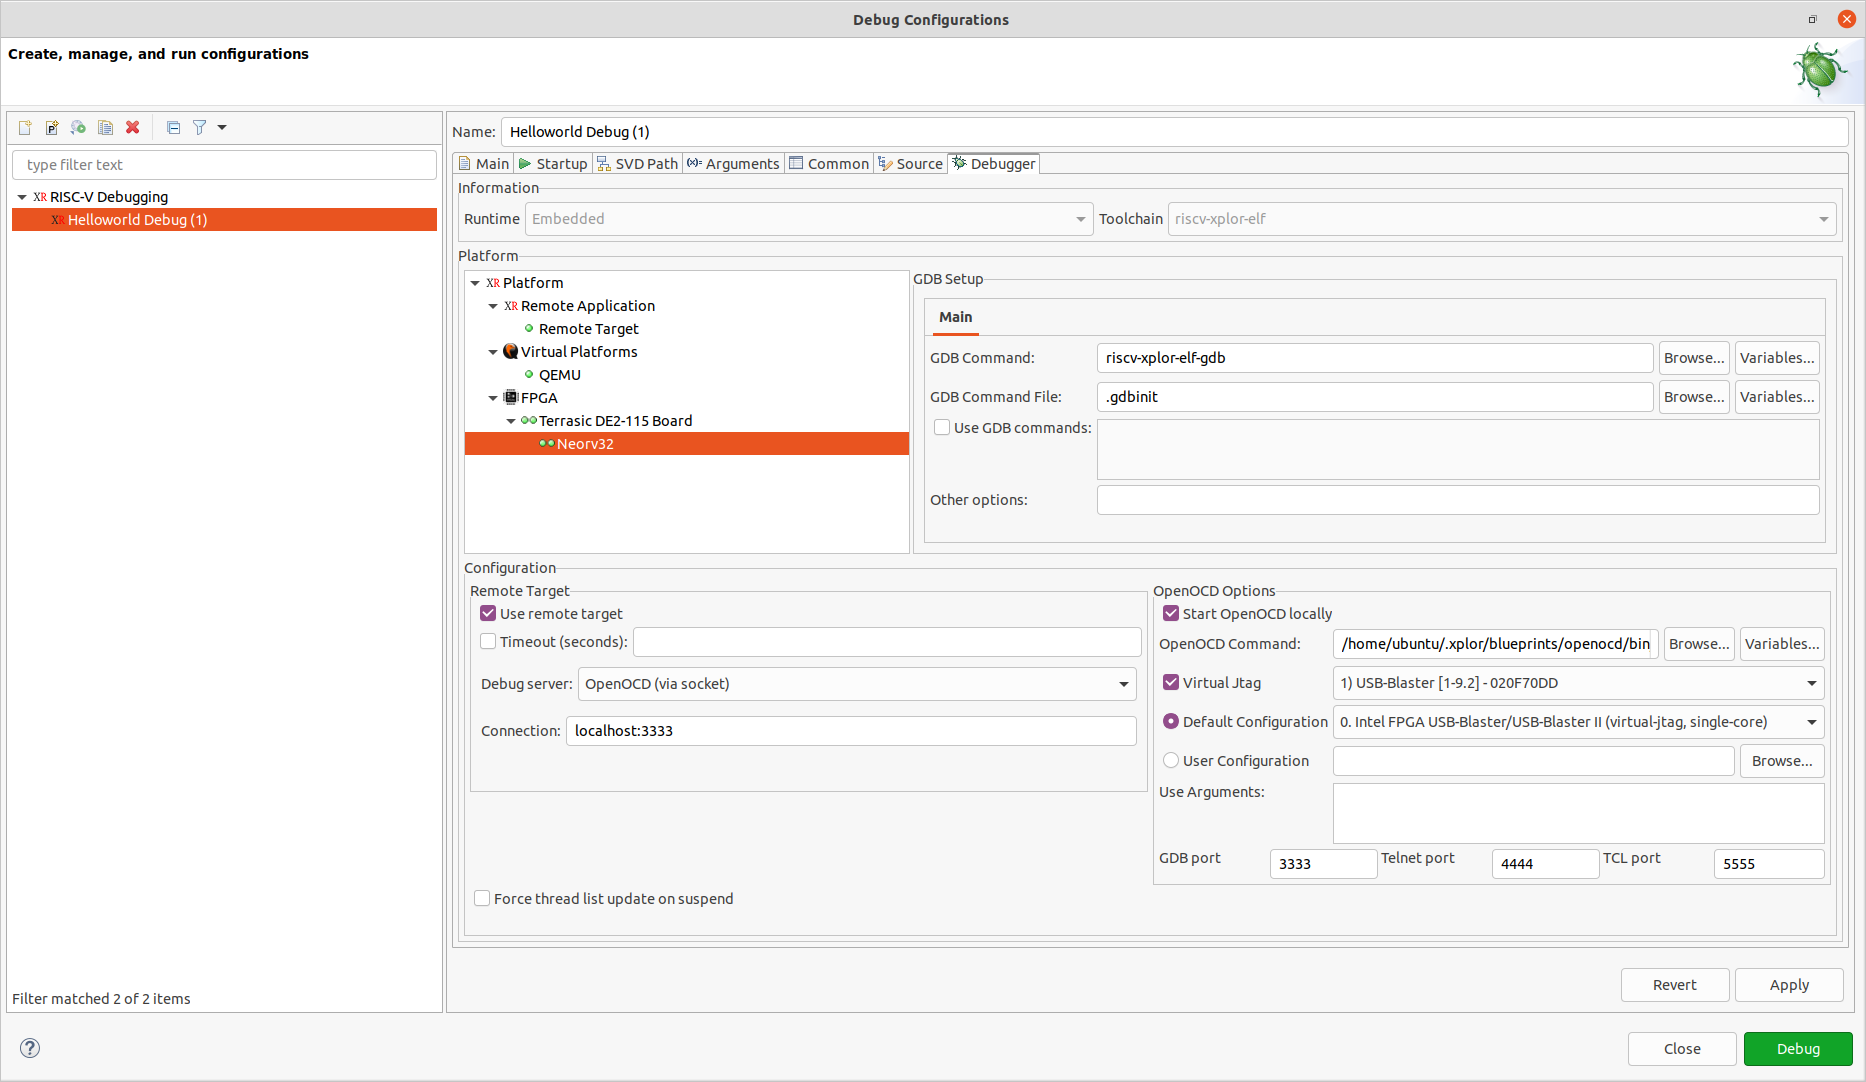
To debug the application on hardware, select project in the Project Explorer, click Debug as > Debug Confihurations
Then create a new RISC-V Running configuration with the following information.
On tab Debugger:
- Platform: Choose hardware platform, for example: FPGA > Terrasic DE2-115 Board > Neorv32
After selecting Apply and Debug, the IDE changes to the debug perspective and automatically sets a breakpoint in the first line of code in the main() function.
Notes
Debug project with custom OpenOCD
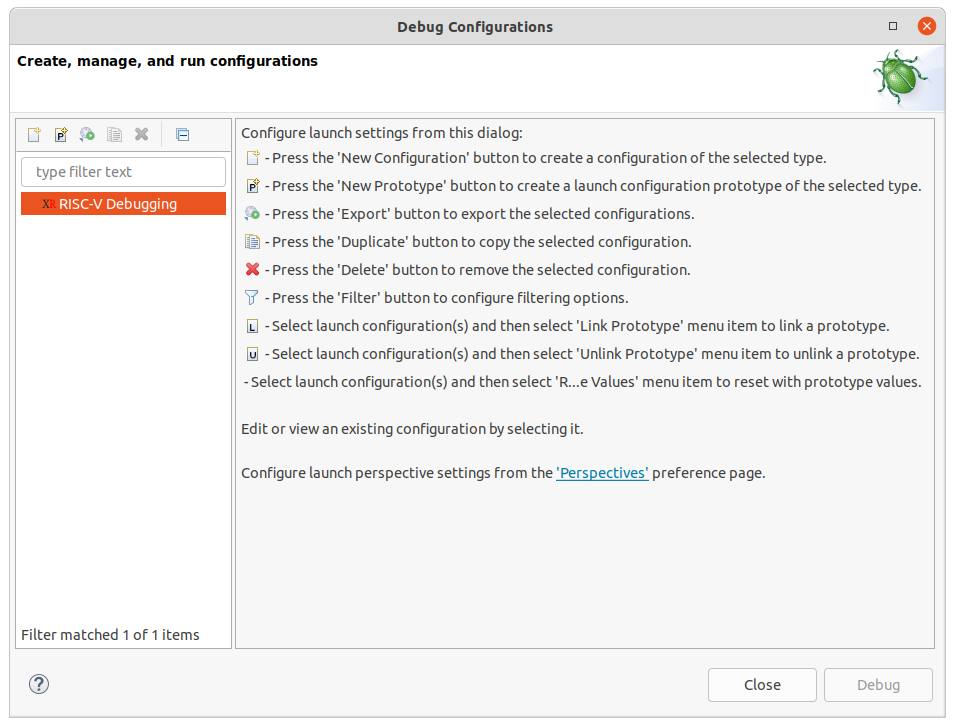
Create a new debug configuration on Debug Configurations dialog by double-clicking on RISC-V Debugging:
On the tab Debugger, select option Terrasic DE2-115 Board in FPGA
On the OpenOCD Options, we use the openocd binary of Quartus and the default openocd configuration file.
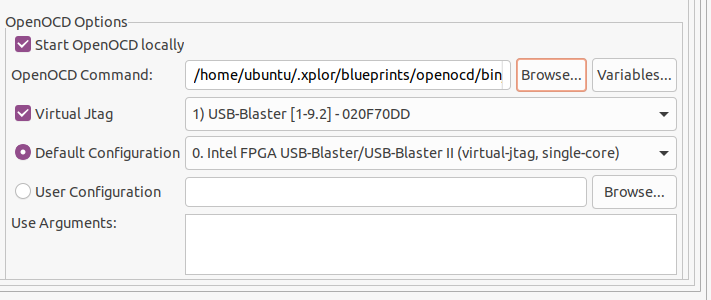
Users can browse the custom openocd binary and the custom openocd configuration file.
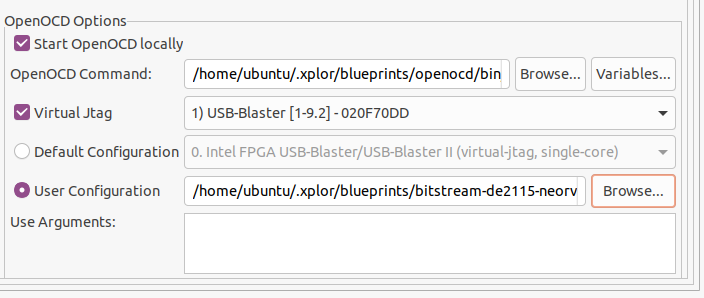
Click Apply then click Debug to start debugging with the custom openocd binary.
For FPGA Cyclone 10 GX
In Programming Bitfile step, please choose the JTAG Cable has postfix is
02E120DD. If not, it will show error like belows:*************** Intel FPGA board flash start *************** Info (19848): Regular SEU info => 105 sector(s), 8 thread(s), 10000000 interval time in microsecond(s) Info (19848): IO hash is 375D44051CBCD1FB1F349EB0B5ACD027F92657328775E3F463232CDB69BE6348 Info (19848): Keyed hash is B670402376FE190A33DBF30EBAD19B18AACC03926BD9F0F5A709DA7A30CF88C2 Info (19848): Design hash is 77B1BDFD03B8C8A53D651348C5A9BFFF51434DB77B1C5336286B597E40C3EA22 Info (19848): IO hash is 375D44051CBCD1FB1F349EB0B5ACD027F92657328775E3F463232CDB69BE6348 Info (19848): Keyed hash is CFA76139E3B99B431DB2D40867858F9DF93B0E80F91C3D1907853B7A1B913025 Info: ******************************************************************* Info: Running Quartus Prime Programmer Info: Version 23.2.0 Build 94 06/14/2023 SC Pro Edition Info: Copyright (C) 2023 Intel Corporation. All rights reserved. Info: Your use of Intel Corporation's design tools, logic functions Info: and other software and tools, and any partner logic Info: functions, and any output files from any of the foregoing Info: (including device programming or simulation files), and any Info: associated documentation or information are expressly subject Info: to the terms and conditions of the Intel Program License Info: Subscription Agreement, the Intel Quartus Prime License Agreement, Info: the Intel FPGA IP License Agreement, or other applicable license Info: agreement, including, without limitation, that your use is for Info: the sole purpose of programming logic devices manufactured by Info: Intel and sold by Intel or its authorized distributors. Please Info: refer to the applicable agreement for further details, at Info: https://fpgasoftware.intel.com/eula. Info: Processing started: Fri Sep 15 15:56:03 2023 Info: System process ID: 13773 Info: Command: quartus_pgm -c 1 -m JTAG -o p;/home/ubuntu/.xplor//components/bitstream-s10gx-corevmcu/s10gx_corevmcu.sof@1 Info (213045): Using programming cable "USB-BlasterII [1-8]" Info (213011): Using programming file /home/ubuntu/.xplor/components/bitstream-s10gx-corevmcu/s10gx_corevmcu.sof with checksum 0x46CB0DC5 for device 1SG280LU2F50@1 Info (209060): Started Programmer operation at Fri Sep 15 15:56:09 2023 Info (18942): Configuring device index 1 Error (18939): Unexpected error in JTAG server: Chain in use - check Error (209012): Operation failed Info (209061): Ended Programmer operation at Fri Sep 15 15:56:09 2023 Error: Quartus Prime Programmer was unsuccessful. 2 errors, 0 warnings Error: Peak virtual memory: 2326 megabytes Error: Processing ended: Fri Sep 15 15:56:09 2023 Error: Elapsed time: 00:00:06 Error: System process ID: 13773In the Run project step, in Main > Configuration > Default Configuration, please choose
FPGA USB-Blaster II (vjtag, vexriscv-c10gx).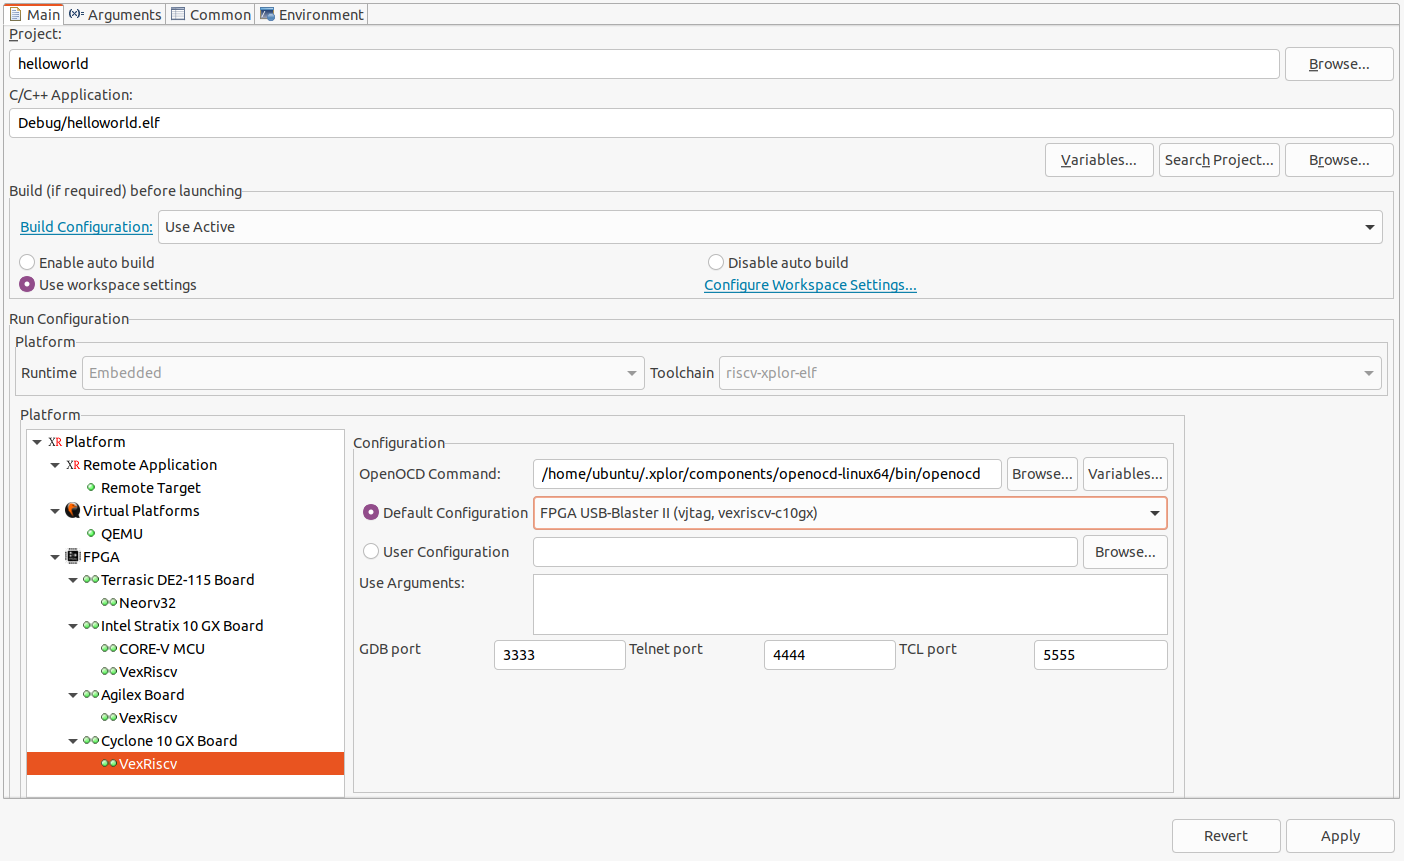
If not, the debug session will be terminated immediately because of wrong OpenOCD configuration.
In the Debug project step, in Debugger > OpenOCD Options > Default Configuration, please choose
FPGA USB-Blaster II (vjtag, vexriscv-c10gx).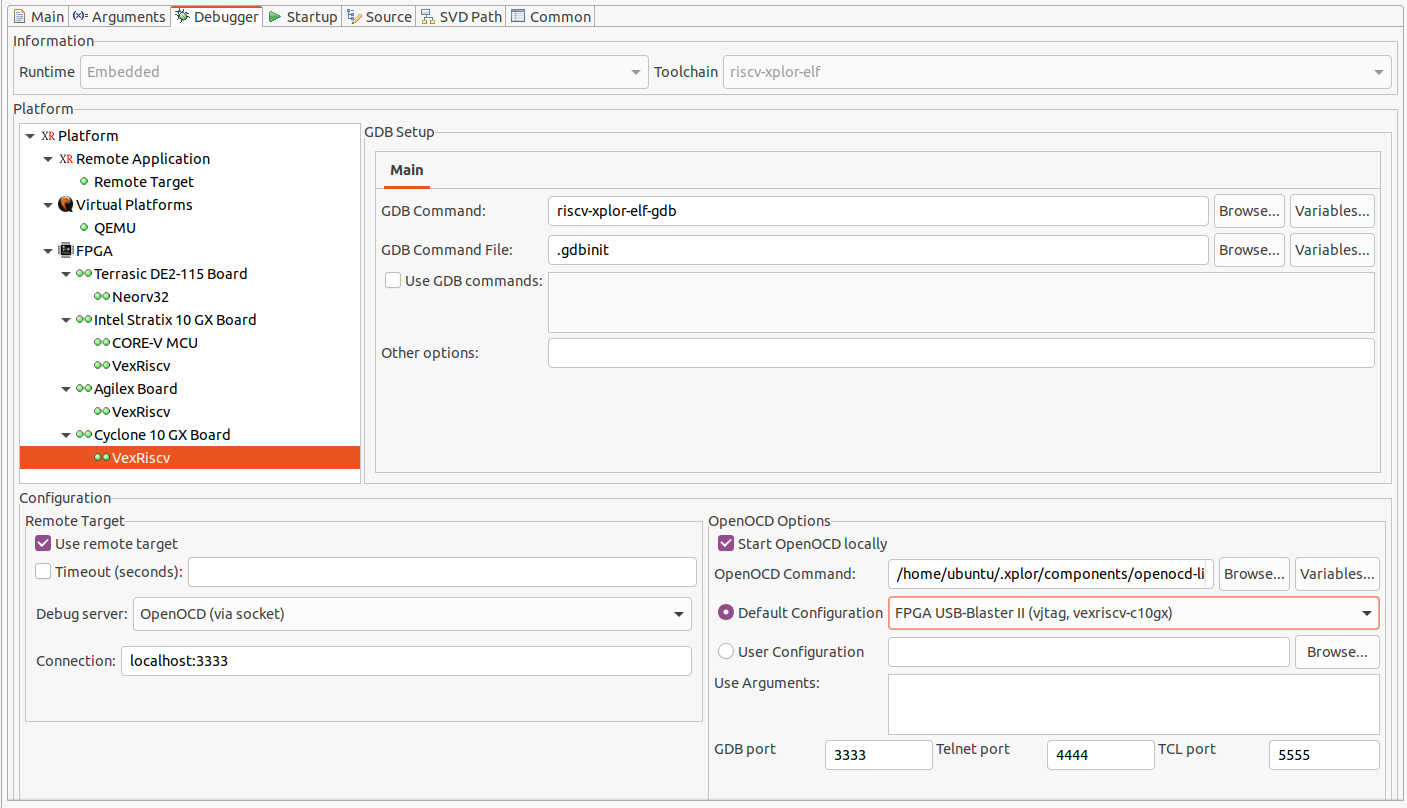
If not, the debug session will be terminated immediately because of wrong OpenOCD configuration.
Common errors
Feedback
Was this page helpful?
Glad to hear it! Please tell us how we can improve.
Sorry to hear that. Please tell us how we can improve.